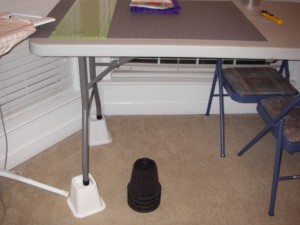
 How many times have you been cutting and then tried to stand upright? The feeling can be overwhelming. You realize that your back feels like a pretzel and have to stretch it out. And worse than that, you DON’T want to lean over again and keep cutting. We all know it’s important to stretch and move at least every 15 minutes but even that isn’t always enough. The best thing that I have found are bed risers! They’re light enough to push under your table legs as you hold up each side and sturdy enough to support the table and any weight you may put on them. My last batch stated that they would hold up to 500 lbs. Since I have classes at the house, it’s important to be able to lift up the tables if everyone is cutting. I just picked up a set at Big Lots for $5. Target and Bed, Bath and Beyond also sell them. So far, I’ve seen them in only black and white. They’ve also been under my dining room table and been very stable. This time of year is wonderful to pick them up, since so many college students have them on their list.
Category: Tips
Selvage and Fold

 Beginning Sewers sometimes seem to have a hard time with selvage and folding fabrics to cut a lay out. The best way to know that you have your fabric laid out correctly is to make sure you have a fold on one side and the selvages meet on the other. If you have a fold and 2 selvage edges than you need to refold BEFORE cutting your fabric. This will ensure that you have enough fabric to complete your project.
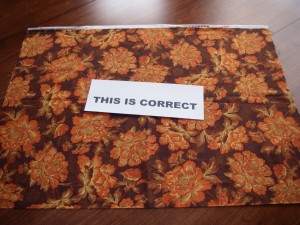
The first photo has the fold at the bottom and both selvages at the top with the cut edges at the left and right. This is the correct way to have the fabric laid out.
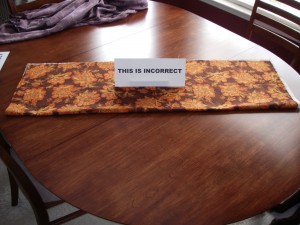
The second photo also has the fold at the bottom but has selvages at both the right and left side with the cut edges together at the top. This is incorrect and will cause you all sorts of problems. Both photos contain the same piece of fabric, but how you fold them will change the width of the fabric and your pattern pieces will not always fit.
Quick Pillowcases
The first project we make in Basic Sewing is a pillowcase. I change up the pattern a little and we use flat construction instead of matching individual tube of fabric. I’ve come across a wonderful, quick and easy pillowcase video for those that would like an even quicker method. I always think it looks like a big hotdog filled with the body and trim. It’s done by Missouri Star Quilt Company on YouTube. Take a couple minutes to watch it. You’ll be amazed how quickly it comes together!
Tired of Pinning?
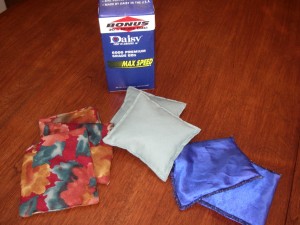
 One of the best ways to hold down a pattern without pins is with pattern weights. Why buy them when you can make your own? I picked up my filler in the Sporting Goods section of Wal-Mart. Believe it or not, my filler is BB’s! My weights look like bean bags just like children use in their games. They are made the same way but are quite heavy. I use leftover fabric from my projects and can finish them with whatever machine I’m using.
With the serger, I use a long rectangle, fold it in half, serge 2 sides, turn the corner, fill with the BB’s and then finish serging. With the sewing machine I use 2 squares wrong sides together, sew around 3 sides, backstitching at the start and end. Turn right side out, fill with BB’s and fold the edges in and sew closed. You can make the squares any size you want, mine are approx 3″ square finished.